Alright, so here is a CD case tutorial inspired by my Software Box Tutorial. This one is actually a bit easier to make.
1) Create a 550x550 image with a white background. Create a new layer and make a rectangular selection that is a about 400x400 pixels.
2) Give the selection a background color, so we can see the base of the case. Right click on the layer, Alpha to Selection. Copy and paste. Press the new layer button so the rectangle is on it's own layer that is equal to it's size. You can delete the other copied layer.
3) Now decorate the newest layer to your liking so it looks like a CD case cover. Here's mine:

4) Now, we will add some rotation to it. Rotate it to your liking with the Rotate tool. I rotated mine to appear tilted upward. Now duplicate the layer. Right click, alpha to selection on the duplicated layer. Fill the duplicated layer with a dark color that matches your color scheme. Put the dark layer behind the designed layer and move it to where it appears to "shadow" the designed layer, or gives it depth.

5) Now we will make the CD that goes inside it. Create a new layer. Use the ellipse tool and make selection of a bout 390x390 pixels. Fill it with a light gray. Duplicate the layer and right click, alpha to selection. Fill the selection with a dark gray. Make the darker layer shadow the lighter layer like we did with the box.
6) With the lighter layer on the CD selected, go to Filters -> Light and Shadow -> Lighting Effects. Play around with the light until you get something like mine.
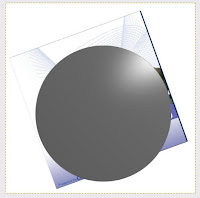
7) Merge the two CD layers. Move the CD layer between the front designed part of the case and the back part. Position it like mine. Merge the layers.

8) Now we will create the reflection. Duplicate the CD case. On the duplicated layer, go to Layer -> Transform -> Flip Vertical. It should now be upside down. Move that layer below the original, making it reflect it. Then, right click on the upside down layer and alpha to selection. Use the FG to Transparent gradient, with white as the foreground color. Apply the gradient to where the bottom layer appears to fade out. It should look somewhat like mine.

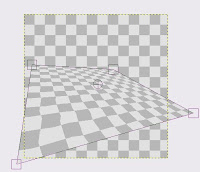
9) Now we will make the grid. Create a new layer. Choose a light gray for your foreground color, and a darker, but not too dark, gray for the background color. Go to Filters -> Render -> Pattern -> Checkerboard. Raise the pixel size to about 40. Click Ok.
10) Now we will position the layer to look like a 3D rendered grid. Use the perspective tool and position it like mine. You may need to zoom out a bit.
11) Click Ok. Move and resize all layers as you may need to. When you are done you should have something like mine.

|,,|-.-|,,|