Alright, so I was browsing the forums at Gimper.net and Gimper asked in a post to convert the rest of these Photoshop Layer styles to Gimp gradients...all 130 of them. So I said I would and I did. These are the original layer styles by
dezinerfolio:

These are the
30 Gimper converted:

So now, here's a tutorial on how to convert gradients.
Here are the layer styles I downloaded, scroll down a bit to find the download link:
http://www.dezinerfolio.com/2007/05/06/ultimate-web-20-layer-styles/You will also need Photoshop (I used CS3 but it doesn't really matter what version you use..) and you will also need
Gimp.
First, I will show you how to make the regular, two colored gradients, like this:

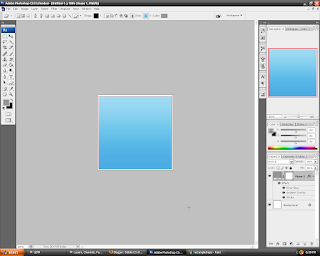
Open Photoshop. Make a new image. Any size will do. I used 300x300 pixels, but it doesn't really matter. Select the Custom Shape Tool

. Now select the black rectangle shape

and click and drag it to a reasonable size on your canvas. Now select one of your layer styles by going here:

and pick one similar to the one we are working with. Your shape should take on the layer style you selected:
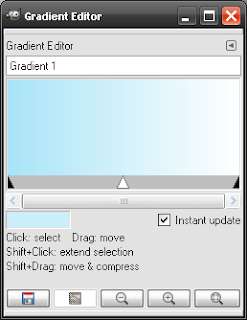
Now you can easily view your layer style. Now open Gimp. Don't start a new image. Instead, go to File -> Dialogs -> Gradients. Click on the new gradient button

. You are represented with this screen:
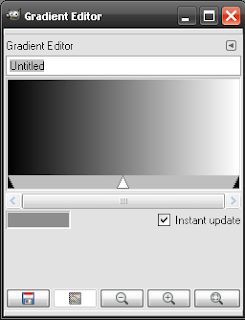
Name the gradient whatever you like. For the purposes of this tutorial, I will name mine Gradient 1. Now go back to Photoshop. Select the eyedropper tool

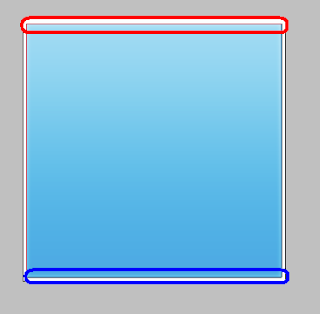
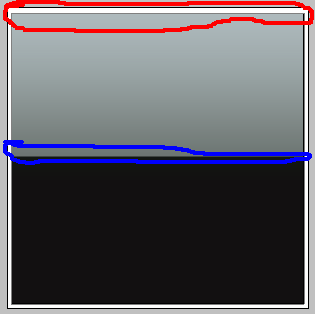
. With the eyedropper tool, select a color furthermost to the top of the image, circled in red, for the foreground. Then select a color furthermost to the bottom of the image, circled in blue, for the background. Try not to select part of the stroke on your gradient. It'll mess you up.
Click on the foreground color box. A Foreground Color Picker should pop up. Copy the 6 numbers (HTML notation) in the # box

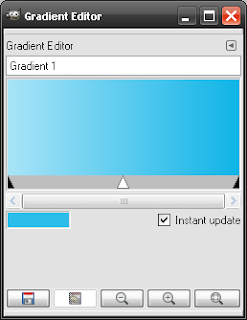
. Go back to Gimp. Right click on the bottom bar (section) and select Left Endpoints Color. Paste the HTML notation in the HTML notation box. Press Ok. The left color on your gradient should be your foreground color from Photoshop.
You should now have something like this (although your left color may not be the same):
Now for the right color. Go back to Photoshop and open up the Background Color Picker by clicking on the background color box. Copy the HTML notation once again. Go back into Gimp and right click on the bottom bar again. Then click on Right Endpoints Color. Paste the HTML notation into the HTML Notation box. Press Ok. You should now have something like this:
Now we're done with this type of gradient. Save it. The other two types that come with the layer style pack are glossy and flat. The flats consist of one color so we don't really need to go over those. I will now show you the glossy kind, like this:

Go back to Photoshop. Click on the Custom Shape Tool
, and then select a new layer style here:
and pick one similar to the one we are working with.
Now, these gradients are a bit different. Selecting the colors are different here. First, select a color near the top for our foreground color. Then, select one near the middle, which would be just above the black in my gradient.
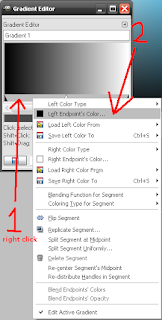
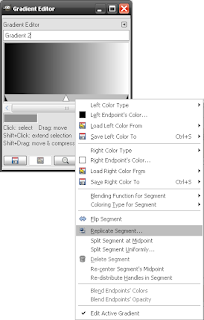
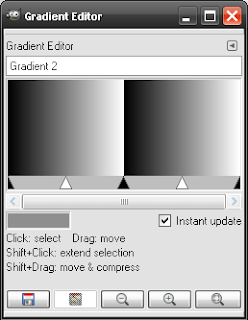
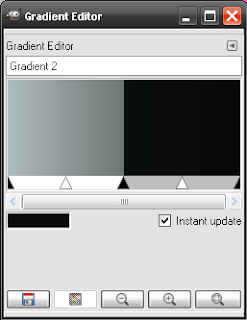
Go back to the Gradients dialog in Gimp. Click the new gradient button. First thing we have to do is right click on the bottom bar then click on Replicate Segment..
In the Replicate Segment dialog, slide the slider to 2, and press Ok. Your gradient should now look like this:
Go back to Photoshop and click on the foreground color box. It should be the color of the top of your layer style. Copy the HTML Notation.
Now, back in Gimp in the Gradient Editor, left click on the left bar, between the two black triangles. The left bar should now be grey, with the right bar as white.
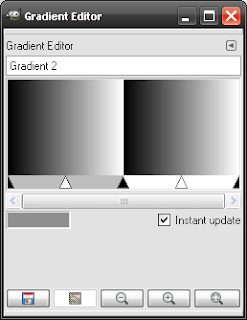
Now right click on the left bar. Then click on Left Endpoint's Color button. Paste the HTML notation in the HTML notation box. Press Ok. The very left color should now be like mine or similar:
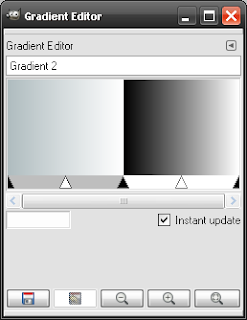
Go back to Photoshop, and click on the background color box. Copy the HTML notation. Go back to Gimp, right click on the left bar again, and select the Right Endpoint's Color option. Paste the HTML notation. Click Ok. It should be similar to mine:
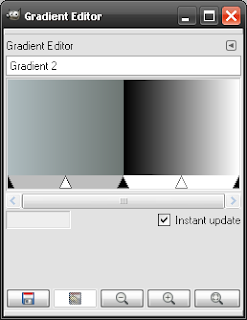
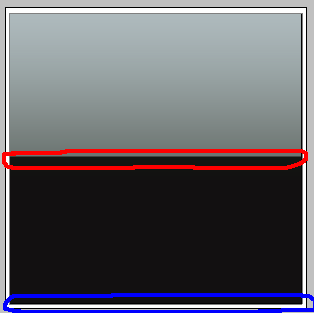
Now, left click on the right bar. The left bar should be white now and the right bar should now be grey. Go back to Photoshop. For your foreground color, select a color near the top of the middle, which would be in the black, not in the grey of my image, circled in red, and for the background, select a color near the bottom, circled in blue.
Now click on the foreground color box. Copy the HTML notation. Go back to Gimp. Right click on the right bar, and select the Left Endpoint's Color option. Paste the HTML. Click Ok. Go back to Photoshop, click on the background color box. Copy the HTML. Go back to Gimp. Right click on the right bar, and select the Right Endpoint's Color option. Paste the HTML. Click Ok. It should now be similar to mine:
Now we're done. Save it and there you go. I haven't figured out how to get that stroke of color on there that seems to border the gradient. It's probably something that'll have to be manually added to your image if you want it. That's the tutorial.

 . Make sure in the toolbox, the paths tool is in Design Mode and polygonal is unchecked. Now, start outlining your dancer with the paths tool. When you get to the end, hold down CTRL and click on the beginning dot. It should look somewhat like mine:


